How to: Create a Remote Gaming Server using Parsec on AWS
As is with many people, I'm stuck at home because of the COVID-19 lockdowns most everywhere. Unfortunately, even with the increased time at home that I can use to game, I'm also stuck with a old-ish gaming rig that's wedged with a video card that is showing it's age. As much as I'd like to order new equipment, I can't do that with the restrictions on deliveries.
I've heard of Parsec some years back, but never really paid it a lot of attention. Being stuck as I was, I decided to give it a shot (also due to the coaxing of some friends), and, boy, was I surprised at the results. The whole setup of having a remote gaming server running Parsec while another (local) machine played the games on it works just as well as described.
So here we are. I thought I'd share how I did my setup on AWS, as well as throw in some recommendations on how to maximize your fun, while minimizing your costs as you do it.
If you wanna skip all the auxiliary details and go straight to the build, just click any of these links to jump straight to it.
Parsec?
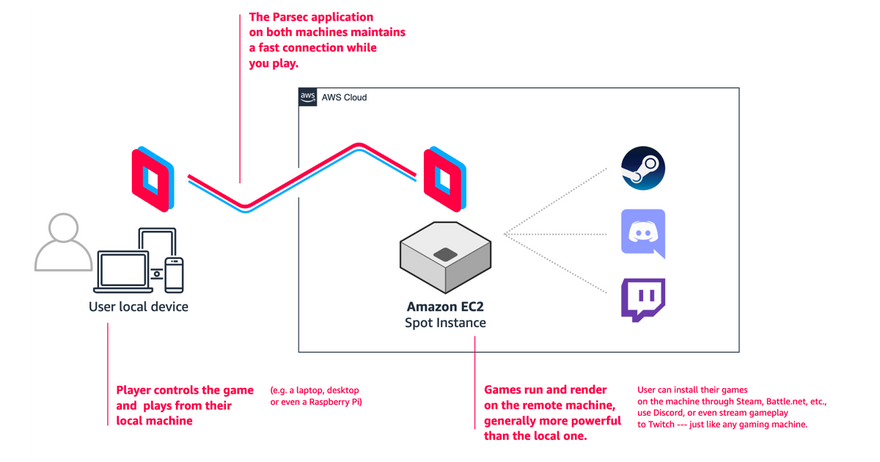
Parsec is a bit of software that works very similarly to how Remote Desktop works for something like a Windows machine. The idea is that:
- You have a (beefy) machine where your games are installed (called the host),
- You have another (less powerful) machine where you want to play your games (called the client),
- Parsec handles the connection between the two so that you can run your games on the stronger machine, while you're controlling your game on the weaker one. Parsec uses networking magic to reduce the lag by a significant amount, while maintaining great graphics quality.
Costs
I opted for a Windows-based g4dn.xlarge EC2 instance in the AWS Hong Kong region. As a spot instance, it's currently costing me USD 0.427 per hour it's turned on, which is about a 55% discount on the on-demand price. Since this is only turned on when I'm actually playing, that's not a bad deal at all.
Your Parsec server will also need storage --- I opted to stick with the General Purpose SSDs. This will cost you even when the server is turned off, so keep this in mind. You will need enough storage to install the games you want to play, but you can always install / uninstall games over time to minimize this. In the AWS HK region, I'm getting this at about USD 0.132 per GB per month.
There are also networking costs involved (since Parsec is streaming your game video out), but I haven't metered and done the math there yet.
So assuming I'm playing an hour every day for a month, with a 100 GB machine, my playtime is coming up to around USD 0.867 for every hour of play.
Not bad.
But will it run Crysis?
Of course, as is with any gaming rig, it has to run Crysis, right? No way was I not gonna try that out.
This Parsec host was running from the AWS Hong Kong region, and was being streamed to a local laptop here in the Philippines, with a reported ping of around 60-80 ms. Assuming we're hitting 60 FPS, that comes to around being 4-5 frames behind (probably double that, since our control input has to go back round to the host server too). Even at that level of lag, though, the game was pretty much playable, and the graphics, while not the best, was extremely better than I expected.
Let's get started
While Parsec will need to be installed on both the host and client machines, the host will need to be a Windows machine to function correctly.
You can also review the hardware requirements for the client machine here.
Create a Windows-based EC2 instance
Unlike what the Parsec documentation says, we'll use the new g4dn.xlarge instance type on Amazon EC2. This is the newest generation of the G-type of EC2 instances, and comes with 4 vcpus, 16 GB of RAM, 16 GB of VRAM, and a Nvidia T4 Tensor Core video card. It's also signficantly cheaper than the older generations, even though it looks to be much more powerful. We'll also use Spot Instances to lower our costs a huge deal.
Go to your Amazon EC2 dashboard, and launch a new instance. Make sure you're in the AWS region that makes most sense from where you'll be playing. (I'm in the Philippines right now, so I opted for the Hong Kong region.)
Step 1:
- Select Windows Server 2019 Base.
Step 2:
- Find and select g4dn.xlarge. This would be under the GPU instances category.
Step 3:
This will be the most involved step. Hang in there.
Purchasing options: opt for Spot Instances. Put in your bid price (I normally set bid price to be the normal on-demand price of the instance).
Persistent request: you'll want this checked, because it allows you to configure ...
Interruption behavior: set this to Stop. This allows you to stop your Parsec server whenever you're not actually playing, saving you more money.
If you don't do this, you can only terminate your server if you want to turn it off, and that's probably not something you want.
Those are really the most important settings here, but feel free to change stuff up if you want to (like, say, the subnets wherein the instance launches).
Step 4:
This is just about storage --- you'll want to put in as much storage as you think you'll need here. Keep in mind though that storage will continue to cost you even when your machine is stopped, so give this a good thought.
You'll also probably want to leave this at the General Purpose (gp2) setting.
You also can set up a small gp2 SSD as your root volume, then go nuts with a second storage disk set to Throughput Optimized (st1) if you plan on using it as the default install location for your games. (For example, Steam allows you to do this.) Setting it up this way will lead to cheaper storage costs (st1 costs about half of gp2).
Step 5:
You don't have to change anything here, but it's always a good idea to at least put in a Name tag for your server, just so you can easily find it later.
Step 6:
This step is crucial, because this is where you define what networking connections are allowed to and fro your machine.
At the very least, you'll want to open the following inbound rules:
- (RDP) TCP/3389 from Anywhere
- UDP/8000-8200 from Anywhere
- UDP/9000-9200 from Anywhere
- TCP/5900 from Anywhere — only if you want to access your machine via VNC

Step 7:
Confirm your settings, here and proceed with launching.
When you launch, you will be prompted for a key pair. Opt to Create a new key pair, download it, and keep it somewhere safe.
Your machine will take a couple of minutes to launch, but we don't have to wait for it to finish to do the next step.
Allocate an Elastic IP
Your Parsec host server will need to have a public IPv4 address that doesn't change. To do this, we'll allocate an Elastic IP address on our AWS account, and assign it to the instance we just launched.
Still on your EC2 dashboard, go to Elastic IPs on the left sidebar, and click Allocate Elastic IP address on the top of the screen. Just accept the defaults, and confirm.
Once you're back on the dashboard, select the Elastic IP you just created, then select Actions > Associate Elastic IP address. On the form that pops up, select the instance you just created, and select its private IP address as well (there should only be one anyway). Confirm that, and you're done.
Create an IAM user for the Parsec installation
During the installation process for Parsec, it will need an IAM user to download GRID drivers to augment the video card. Let's prepare this now.
Go to your IAM dashboard, select Users, and then select Add user. Give your user a name (something like parsec-host-server works great), and check Programmatic Access.
On the next screen, opt to Attach existing policies directly, then attach the AdministratorAccess policy. Complete the user creation.
Once the user is created, you'll be given the user's Access Key and Secret Access Key. Store this somewhere safe for now --- we'll use it in a bit.
Prepare your EC2 instance
By now the EC2 instance you created should have finished launching already. You will then need to connect to it via Remote Desktop.
Select your EC2 instance, then click Connect at the top. Follow the instructions for a Remote Desktop connection.
Once you're connected, you'll want to do a few things before you actually start installing Parsec on the machine.
Change the Administrator password
You'll probably want to change the password to something saner. Totally optional, but I prefer changing the password to something else so that the key pair we generated for the machine effectively becomes useless too.
Disable CTRL+ALT+DELETE to unlock
By default, Windows is set up to require you to press CTRL+ALT+DELETE whenever you unlock the machine --- once Parsec is set up (and we're not using RDP anymore), we won't be able to do that, so we'll need to disable this (so that Parsec can also autologin for us).
From your Start Menu, search for Local Security Policy. Navigate to Local Policies > Security Options, and change the Interactive Logon: Do not require CTRL + ALT + DEL option to Enable.
Install Parsec
Here we go. Open up Powershell from your Start Menu, then paste in the following commands. (Alternatively, go to the script's Github repo, and grab the one there.)
[Net.ServicePointManager]::SecurityProtocol = "tls12, tls11, tls"
(New-Object System.Net.WebClient).DownloadFile("https://github.com/jamesstringerparsec/Parsec-Cloud-Preparation-Tool/archive/master.zip","$ENV:UserProfile\Downloads\Parsec-Cloud-Preparation-Tool.zip")
New-Item -Path $ENV:UserProfile\Downloads\Parsec-Cloud-Preparation-Tool -ItemType Directory
Expand-Archive $ENV:UserProfile\Downloads\Parsec-Cloud-Preparation-Tool.Zip -DestinationPath $ENV:UserProfile\Downloads\Parsec-Cloud-Preparation-Tool
CD $ENV:UserProfile\Downloads\Parsec-Cloud-Preparation-Tool\Parsec-Cloud-Preparation-Tool-master\
Powershell.exe -File $ENV:UserProfile\Downloads\Parsec-Cloud-Preparation-Tool\Parsec-Cloud-Preparation-Tool-master\Loader.ps1[Net.ServicePointManager]::SecurityProtocol = "tls12, tls11, tls"
(New-Object System.Net.WebClient).DownloadFile("https://github.com/jamesstringerparsec/Parsec-Cloud-Preparation-Tool/archive/master.zip","$ENV:UserProfile\Downloads\Parsec-Cloud-Preparation-Tool.zip")
New-Item -Path $ENV:UserProfile\Downloads\Parsec-Cloud-Preparation-Tool -ItemType Directory
Expand-Archive $ENV:UserProfile\Downloads\Parsec-Cloud-Preparation-Tool.Zip -DestinationPath $ENV:UserProfile\Downloads\Parsec-Cloud-Preparation-Tool
CD $ENV:UserProfile\Downloads\Parsec-Cloud-Preparation-Tool\Parsec-Cloud-Preparation-Tool-master\
Powershell.exe -File $ENV:UserProfile\Downloads\Parsec-Cloud-Preparation-Tool\Parsec-Cloud-Preparation-Tool-master\Loader.ps1This script will download the Parsec preparation script by James Stringer, and execute that in the Powershell context. It'll basically prepare most everything for you, and you'll just need to watch it go to town.
It will ask you a few things from time to time, so don't leave it for too long.
Once Parsec has been installed, make sure you log into your Parsec account in it.
Parsec configuration changes
I had to make a few config tweaks on Parsec to make it work completely:
- Host
- Hosting Enabled: Enabled (of course)
- Host name: Change this to something that makes more sense for you
- Network
- Client Port: 9000
- Host Start Port: 9100
The install script above should have taken care of most everything else.
Other stuff to take care of
The install script should've taken care of installing Xbox software (for gamepad compatibility), and Razer software (for audio). To complete the setup, we'll need to do a few more things.
Set up Auto Logon
On your desktop should be an Auto Logon folder. Open it and run the script inside. Type in your user name as Administrator, and the computer password (you should've changed this by now). Confirm that auto logon has been completed successfully.
Run GPU Auto-updater
Also on your desktop is a shortcut for the GPU Auto-updater script. This will install any other missing drivers / software required for your video card.
Once you run this, it will prompt you for a few things --- just say yes when it asks if it's OK to reboot. This will also ask for IAM user credentials --- put in the IAM user access key and secret access key we prepared earlier here.
Your machine will need to reboot once or twice to complete this step. When the machine reboots, just connect to it again via RDP, and run the GPU Auto-updater tool again. It will tell you if the installation is complete when you do.
Set up auto-shutdown
Also installed by the script earlier is a script that sets up automatic shutdown for the machine when it has been idle for a while. Consider running this so that the EC2 instance stops when you haven't been using it (and saves you money).
I've personally set mine to auto-shutdown after 20 minutes of inactivity.
Confirm that you can connect via Parsec
Make sure your remote desktop session is disconnected at this point.
From another machine, install Parsec (not using the install script this time). Log into your Parsec account, and just confirm that you can connect to your Parsec host server.
Once you're connected, Parsec will function just like Remote Desktop earlier, but it will generally feel more fluid and faster.
At this point, you can then install your games (e.g. Steam), and your gaming apps (e.g. Discord), and use Parsec to play remotely.
Cleanup
There's a bunch of things you'll want to do once you've confirmed that you can connect via Parsec.
Close down your RDP and VNC ports in your security group
Remember the security group we created earlier for our EC2 instance?
Once you've set up your Parsec connection, you won't need to remote desktop and/or use VNC anymore (and even if you do, you can always just open the ports again).
So you'll want to modify the security group to remove the RDP and VNC ports to make your machine a bit more secure.
Remove the access credential from your IAM user
Also at this point, your EC2 instance won't need the IAM user you created earlier anymore.
To ensure it can never be used again (remember: this has Administrator permissions!), you can either delete the IAM user itself, or revoke the access credentials you've given it in IAM.
Outcome
Your latency will greatly depend on which AWS region you set up your machine, and where you're playing from. I set up Parsec hosts in the Singapore, Tokyo, and Hong Kong regions in AWS, with best results streaming to the Philippines from Hong Kong.
It also seems like the lag differs from game to game as well, even if the network latency is the same. I found that the gameplay experience of, for example, Crysis 2 and Witcher 3 were really good, but Borderlands 3 was very difficult to play --- even if the latency across all three games were the same.
Here are some more sample videos: