I'm building my own hitbox-style fightstick controller
I am absolutely hyped up for Street Fighter VI.

When I was still in high school, a huge amount of my free time went to visiting the video game arcades. The fighting games were my go-to then. I got hooked with Capcom's Marvel Super Heroes back in middle school, but it was definitely high school when I got totally hooked. Me and my friends would easily gobble up whatever the fighting game of the season was then, and just spend the afternoons after school (and our lunch money) plonking coins into arcade cabinets.
I'd eventually move on to spending even more exorbitant amounts of time in rhythm games (my favorite was Konami's DrumMania series), but fighting games never really left. To this day, I'd argue that Street Fighter III: 3rd Strike is one of the absolute best fighting games of all time.
That, and that the small amount of teaser content that's been released for the upcoming Street Fighter VI seems to suggest that Capcom's really steering this next one into great gaming waters, made me decide that, hey, I want to have a fightstick of my own to play with — why not build my own?
Yeah, totally logical
The very first thing I did was look for prior art.
I very quickly came across the GP2040-CE project, an open source firmware for fightsticks that ran on an RP2040 MCU. It seemed great — it has support for a good amount of consoles and machines, allowed for 8+2 action buttons out of the box (P1-P4, K1-K4, L3, R3), had what looked to be a convenient customization interface, and (most importantly) the option for RGB LEDs.
Yeah, this looked like a stellar starting point.
Looking for projects based on GP2040-CE, I think one of the better ones I found was Flatbox (specifically, the Flatbox rev 4).
To be honest, Flatbox looked to be almost perfect to me, but I really wanted to put in a few changes (improvements?) for myself:
1. Slightly bigger buttons
I have very chonky hands, and the Flatbox uses 24mm diameter buttons. As much as I really want a small form factor fightstick, I feel like this size might feel a bit too cramped for me. I'm thinking a more standard 28 / 30 / 32mm size would be better.
2. Slightly angled button positioning
I still want to keep the fightstick as small as possible so that it's portable, just like the Flatbox. But that also means that, unlike a traditional arcade panel, a player's arms will have to come into the fightstick at a more constricted angle, just like with a traditional keyboard.
And just like with keyboards, we want to really want to keep the wrists as straight and parallel with the arms as possible. To make the board a bit more ergonomic, I want to tilt the buttons towards the inside of the board, so that they receive the player's hands at a more natural wrist angle.
3. Optional RGB LEDs
The Flatbox PCB does not have routing for any LEDs. I'm not totally sure yet if I'd want LEDs on my fightstick, but I'd at least want to have the option to do so if I wanted.
Maybe at the very least, have support for underglow. Even better if per-key LEDs can be fixed onto the board.
4. Acrylic case
For some reason, I really want this in an acrylic case. In my head, a clear acrylic case will let me (or anybody else that uses this) customize the board much more easily than a 3D printed one.
Or that frosted / translucent acrylic can better scatter LED glow. I don't know.
A first draft
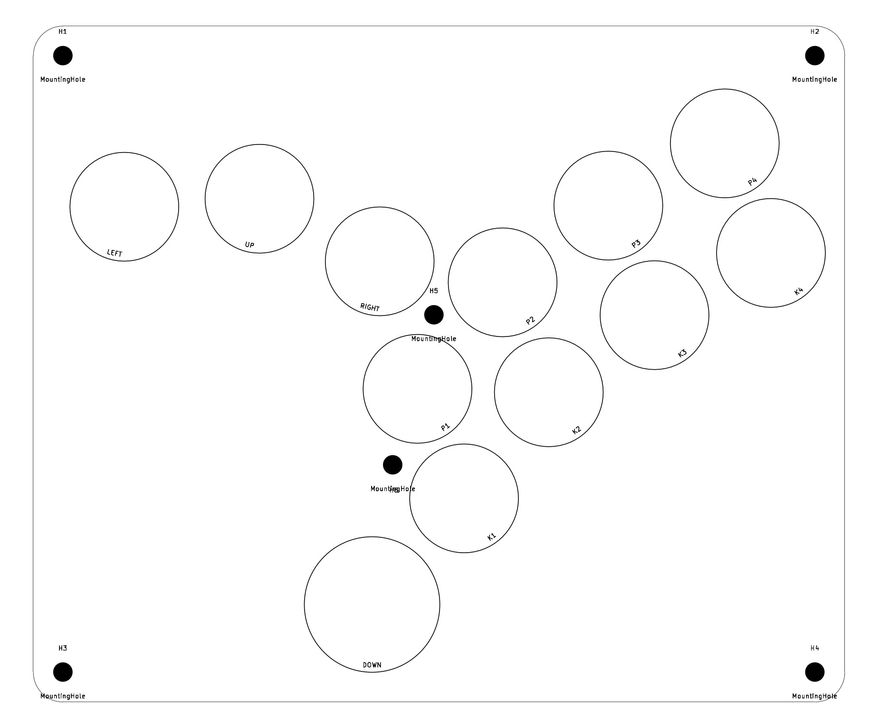
I first came up with a squarish layout idea. I was thinking that the left hand index finger can quite easily position between the right hand index and middle fingers on buttons, so the right hand can bring itself more into the inside of the board.
After a bit of testing and consulting with other folks, I shelved that idea for now. I still want to maybe pursue it someday, but everyone I asked felt like it would feel unnecessarily cramped.
One thing I like about this though is that the K1 button is in a very good position in relation to the UP button at the bottom. Theoretically this would make it easier to use one's right thumb to press either of those. K1 is already very commonly hit with one's thumb (e.g. with P1+K1 and P1 > K1 > P2); having the UP button within small hitting distance gives you two options for a jump.
A second draft
For my second try at a design, I started with a more standard layout first, and adjusted accordingly.
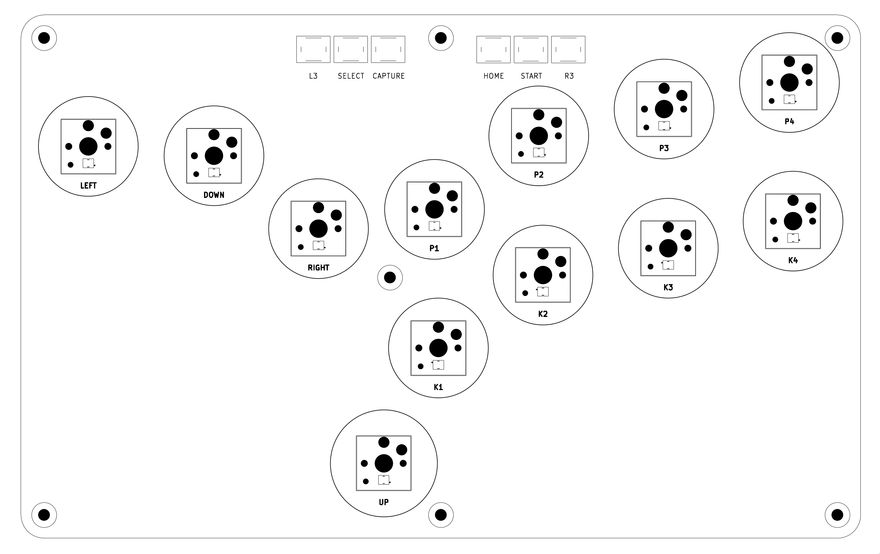
This layout is actually based off of the button layout generalized from Vewlix arcade cabinets. I've adjusted that a bit by:
- Tilting the buttons into the center by about 12 degrees,
- Removed the stick, of course,
- Mirrored the
P1,P2, andP3buttons on the other side, also giving it a slant, - Placed the auxiliary buttons on the center of the board — we don't expect to use them much, but it'd nice if we do have to hit
L3/R3to just right be there, - And finally, eyeballed the positions of the
UPbutton in relation with the positions of the two hand clusters.
I haven't done any serious prototyping with this layout yet. I have printed it on paper 1:1 and the buttons seem to be in good positions for my hands, so I'm hopeful. The UP button is still accessible to both thumbs, and K1 is positioned well for the right thumb too.
The PCB is a bit bigger than I was initially hoping for at 236 x 147 mm, but it's still compact enough for travel.
Now if only we can ensure that the entire build won't be too thick as well. I'm going to try to keep it under 2 cm thick — ideally around 1.0 to 1.5 would be great.
The next steps would largely be designing the PCB.
If you're interested in following along the build, I'm keeping track of progress in this Github repository.