Setting up Microphone Audio Filters in OBS using Reaper plugins
In this time of global pandemic, not only are there more people jumping onto remote online meetings, but there seems to be more people trying out livestreaming and recording videos for the benefit of others online.
However, unlike most any other element you're including in your recording, audio from a microphone will tend to be very finicky. There's a lot of factors that go into the quality of spoken voice --- the background noises from where you do your recordings, the quality of your actual microphone, and even the nuances of your own voice.
If you're using Open Broadcaster Software (OBS) to record, I'd like to share a handful of things you can do beforehand to help ensure your voice sounds cleaner, crisper, and much more professional.
OBS and Reaper
OBS is free and open-source software for video recording and livestreaming. It's very powerful, and while it's not the simplest tool if you just want to get set up and running quickly, it's relatively easy to use considering what you can get out of it.
Reaper is an impressive software suite for working with digital audio. The suite costs USD 60.00 for a personal license (which a lot of my audiophile colleagues say is worth the investment). It's traditionally set up so that the audio from your microphone flows into Reaper, wherein you can set up a pipeline of audio filters, which eventually is then output into wherever it needs to go (normally, your recording). That's not what we're doing today (although it's an interesting setup to learn about as well).
Fortunately, a good amount of the audio filters that Reaper uses is available as a set of VST plugins for absolutely free. Even better, OBS also allows you to bring in third-party VST plugins to supplement and extend what you already get out of the box. So what we'll eventually end up building is a pipeline of Reaper audio filters that clean up your microphone audio before it goes into your stream or recording, all within the OBS software interface. Spiffy.
The only caveat is that the Reaper VST plugins are only available on Windows platforms, so you'll only be able to do this on a Windows machine.
Building the setup
You'll need to have OBS already installed on your machine --- we're assuming you already have that.
Download ReaPlugs
The Reaper VST plugins are collectively called ReaPlugs, and you can download the installer for your system here. Make sure you're downloading the correct executable for your computer (which is probably going to be the 64-bit version).
Conveniently, when you run the installer, it should automatically register itself into your machine so that OBS can discover it for the next steps.
Set our microphone input to a comfortable pickup level
If you haven't configured your mic yet to a default working setup yet, now is a good time to do so. This is important because each physical microphone model behaves and picks up sound differently, and all the next steps will build on top of how your specific microphone performs.
If your microphone has a physical volume knob, it's oftentimes best to set the mic to 100% volume in Windows, and only adjust the physical volume knob whenever you need to. This minimizes the potential distortion that your computer can introduce to the sound.
If your microphone does not have a physical volume knob, open your mic's settings on your computer, and initially set it at 100% with max microphone boost. Continuously speak into your microphone in about as loud a voice as you'd expect yourself to be doing while recording (louder than normal), and adjust the levels so that the audio meter shows the sound almost going to the very top on average, but not all the way. Whenever the audio meter goes to the max, there is a real possibility of the audio signal being clipped, and that's not something we want.
Once you've set your initial microphone pickup levels, you generally won't want to touch those again.
Set up the audio filters in OBS
In OBS, you'll ideally have your microphone already set up as an input audio device. If you right click on your microphone source, and select Filters, you can add in audio filters that OBS will run your signal through during a recording.
Since the filters are evaluated in order (from top to bottom), I'll talk about these in order as well.
Remove ambient / background noise
Unless you're working in an effectively soundproofed environment, you're bound to have some background noise where you're recording. Could be the ongoing hum of your computer, or your room's fan / airconditioning, or the general ambient wind noise from outside. What we want to do before everything else is to try to cancel out all that background noise. Thankfully, that's easy to do with the Reafir filter, and also one of the easiest filters to set up.
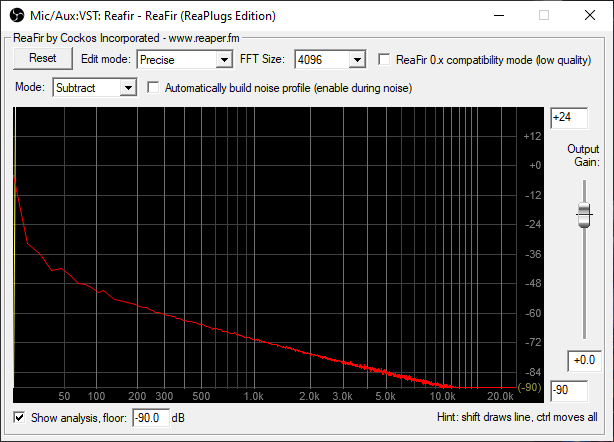
Add a VST plugin into your filters, and select the Reafir plugin on the right side of the OBS panel. Afterwards, go into the plugin settings.
In the settings panel, set the mode to Subtract (since we're essentially removing sound), then click on Automatically build noise profile --- leave it on for 3-5 seconds, then turn it back off. Don't talk or make any noise during this time.
During that time, the plugin will listen on your audio signal, and automatically determine the audio frequencies (and at what levels) it will need to adjust output audio signal to. Since it's set to subtract mode, we're essentially telling the filter to remove the audio it heard during those 3-5 seconds from any audio signal that goes through it in the future.
Remove everything else aside from your voice (ideally)
The above will work wonderfully for static noise, but for things like keyboard clacking, random noises, accidentally clicking your tongue, etc. it's not going to do a lot. Since ideally we'd only want our own voice to carry through to the recording, we also need to proactively remove most other arbitrary sounds. This is what a noise gate is normally for.
A noise gate works by continuously listening in on a specific volume threshold --- if the audio is within this threshold continuously for a set amount of time (generally what happens when we talk), then the noise gate will open, and let the audio signal through. Otherwise, the noise gate prevents any audio signal from getting through at all. It's a bit of an all or nothing.
So add another VST plugin into your filters, and set it to a Reaper noise gate. Again, just jump into its configuration.
There's a bunch of stuff here that we'll need to tweak. So here goes:
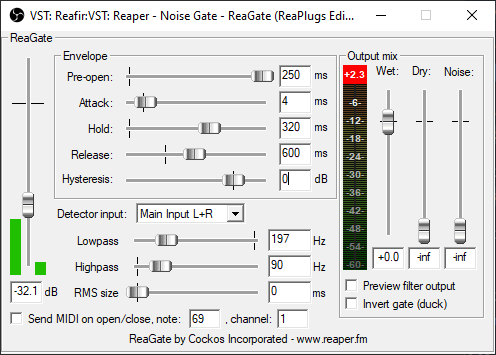
To the left is a vertical volume threshold meter. Speak into your microphone continuously in your most normal cadence, volume, and tone --- how you'll be speaking most of the time during your recording.
The green meter will bob up and down as you speak, so you'll want to bring the slider down so that it's just below of the general peak area of the green meter when you're speaking normally.
You're essentially telling the noise gate to consider only audio that go above that volume threshold level and discard anything lower.
Pre-open is how long the audio has to be (continuously) above the threshold level before the noise gate allows audio through.
Attack is how quickly the gate opens when it determines that it needs to allow audio through.
Hold is the opposite of pre-open --- once the noise gate is open, this determines how long the audio has to be (continuously) below the threshold before it closes back again.
Release is the opposite of attack --- how quickly does the gate close when it needs to.
Hysteresis turns your threshold from (1) above into a range instead of just a single number. To vastly oversimplify things, if the noise gate only used a single threshold number for both deciding when to open and when to close, the audio tends to have a lot of chattering.
Your hysteresis setting tells your noise gate what your closing threshold is (as you want this lower than your opening threshold). If you have a threshold of -20 dB, and a hysteresis of -5 dB, then your noise gate uses -20 dB to determine when to open, and -25 dB to determine when to close.
I've read that a value of -6 to -8 dB is a good starting value for this.
Lowpass and highpass tells the noise gate what range of audio frequencies to consider for deciding when to open and close. As you can imagine, this works hand-in-hand with your threshold setting above.
I've read that 85-255 Hz (that is, a lowpass of 255, and a highpass of 85) is a really good average for male and female voices, but you'll definitely want to tweak this to better match your own vocal tone.
Setting this correctly is going to very significantly affect how much benefit you get from your noise gate, because it'll be better at pinpointing your voice from other noises (instead of just relying on how loud your voice is).
Equalizing
I personally think an equalizer is the hardest thing to tweak in this whole set, largely because there's so many factors that go into it, and that it's the filter that is most dependent on the nature of your own voice.
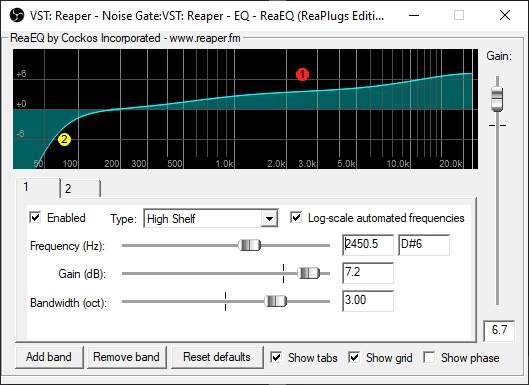
I've received the following recommendations that I've used for my own setup, which only use 2 bands:
Band (1) is a High Shelf filter, meant to give a bit more oomph to the pops in your own speech (like consonants or stops). Set this to around 3000 Hz first with a bandwidth of 3 octaves, and a gain of around 10 dB, then adjust based on how your own voice sounds in recordings.
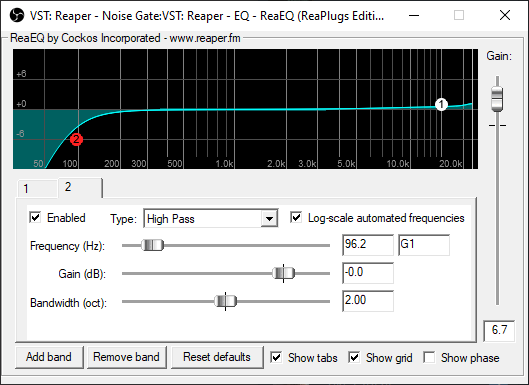
Band (2) is a High Pass filter, meant to cut some of the bass in your voice. Set this to around 60-80 Hz, and play around with it to match your preference.
Obviously, you can do more with this, but I honestly don't know enough about it to tell you more.
Cut out sudden loud shouts
Most especially if you're livestreaming video games like I do, you're bound to find yourself in situations that just make you suddenly scream loudly, or shout at your teammates, or other similar things. While this is all fun and exhilirating for the player, anyone watching wouldn't appreciate being suddenly shot an earful of maxed-out vocals without a volume warning.
This is what an audio compressor is for. A compressor will weaken the volume of loud sounds, as well as amplify the volume of quiet sounds, so you kind of hit two birds with one stone --- it'll cut out the volume whenever you shout, but it will also make your own whispers more pronounced and intelligible. Perfect when you're sneaking around a game!
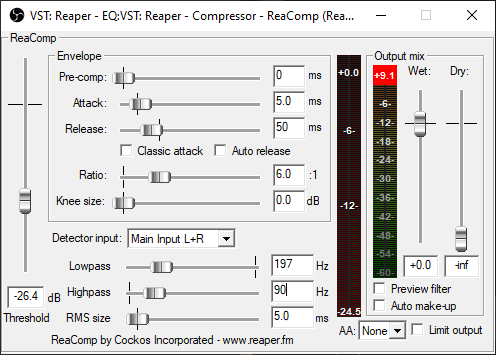
Throw in another VST plugin, and set to a compressor (not the compressorx!), and jump into the settings.
Attack and release work in pretty much the same ways as the ones for your noise gate above. I've been recommended 5 and 50 ms for these respectively as a starting point.
Ratio is an indication of how much the filter compresses the audio signal --- a 6.0:1 ratio should be a good start.
You'll probably want to set lowpass and highpass to the same settings you've used for your noise gate too.
Threshold will need a bit more TLC. You'll want to speak continuously at a low volume --- around as soft as you'd speak when you're trying to be quiet in your recordings --- and set the threshold a little below that. If you're seeing that your voice is not registering at the threshold meter when you're speaking softly, that's probably a good indication that you need to tweak your noise gate a bit more.
The goal here is to tweak the settings above so that when you're speaking --- all across soft, normal, and loud voices --- your output audio is registering just below peak on average (probably around -6 to -12 dB is good). You definitely don't want to have it go into the positive, as this indicates audio clipping.
Plugging overly loud sounds
Your compressor will do pretty much everything to keep your audio output within a certain acceptable volume --- unless you happen to speak so overly loud that it just overwhelms the compressor.
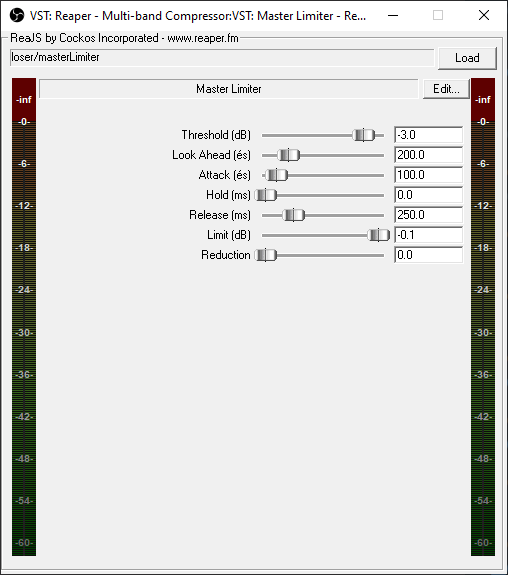
You can optionally put in a master limiter to your audio filter chain to prevent those (supposedly) very rare occassions.
Again, throw in another VST plugin into your chain. There won't be a standalone limiter filter in the choices, so select ReaJS, and in the configuration settings, search for masterLimiter in the loser category.
You'll pretty much only want to tweak two things here:
- set threshold to around -3 dB, and
- set limit to around 0.1 dB
This will effectively stop your audio signal from ever going into the positive.
Maybe a gain?
If at the end of this all, your microphone audio seems to be lower in volume than you initially expected (which shouldn't really happen noticeably), you may want to put in a gain filter to help boost the mic level back up. Totally optional.
A final look
So my final audio filter chain looks like this after all that:
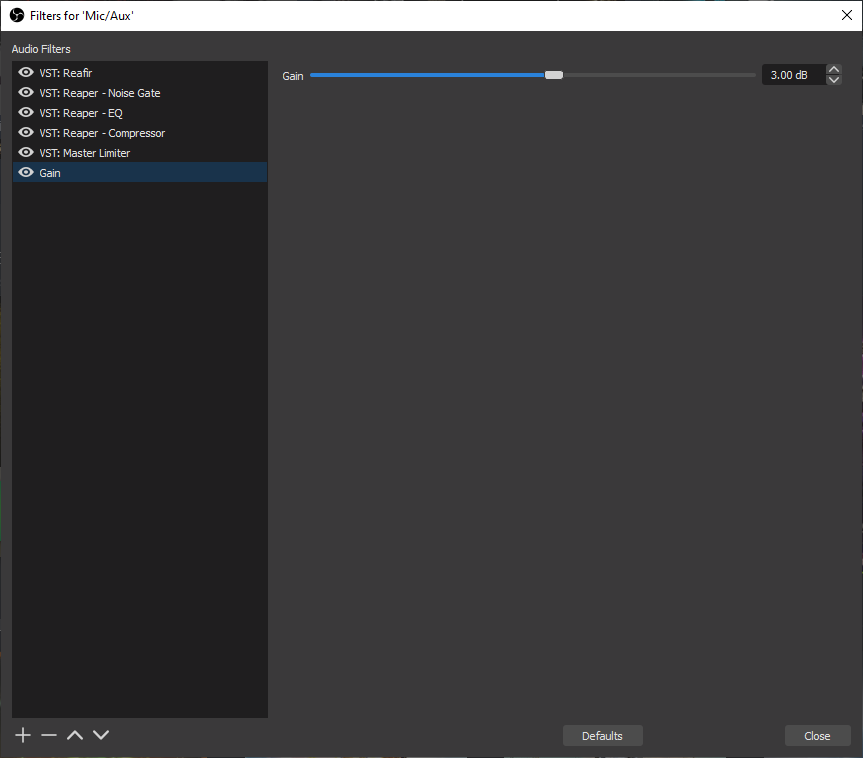
You should have an ultimately cleaner, crisper, and oomphier microphone audio after correctly setting up yours.